Showing posts with label i. Show all posts
Showing posts with label i. Show all posts
Thursday, February 20, 2014
Now What Do I Do With It
I did a carving demo on the 4th of July. I didnt do a whole lot of planning ahead of time but I knew I wanted to work on an "S" curve pattern so I printed a few pictures to work from. Then I grabbed a piece of red oak offcut, my bench, and tools and headed out the door.
It was a good day. I visited with a lot of people as I worked away carving out the pattern. I got a long way but I didnt quite finish the carving. I pulled up to the bench this morning and finished the carving. Its a fun pattern to pull off.

Theres one problem. Usually I have a project in mind when I start a demo. A document box, a panel, something. This time I just carved a random oak board, and Im a little lost about what to do with it now. It measures 38 1/2" long by 8" wide. Its too wide to be a good rail for a joined chest, and its now panel shaped. Its too long to be a side for a document box.
What would you do with it?

Ratione et Passionis
Oldwolf
Read More..
It was a good day. I visited with a lot of people as I worked away carving out the pattern. I got a long way but I didnt quite finish the carving. I pulled up to the bench this morning and finished the carving. Its a fun pattern to pull off.
Theres one problem. Usually I have a project in mind when I start a demo. A document box, a panel, something. This time I just carved a random oak board, and Im a little lost about what to do with it now. It measures 38 1/2" long by 8" wide. Its too wide to be a good rail for a joined chest, and its now panel shaped. Its too long to be a side for a document box.
What would you do with it?
Ratione et Passionis
Oldwolf

Tuesday, February 4, 2014
A House In The Trees Part I
My wife and I have three (3) sons, ages 7, 7 and 3. They destroy a room in a matter of minutes when they “play.” Luckily, the basement is finished and serves as a playroom. We can shut the door and the mess goes away. Unfortunately, the noise doesn’t go away. Since the weather turned last fall, we’ve been eagerly awaiting the day when we can send them outside to play. As an incentive to get out of the house, we decided that it was time to build the tree house.
When she thought it was time to start building, my wife brought the Black & Decker The Complete Guide: Build Your Kids a Treehouse home from the library. I went through it with a slight skepticism. I can’t say I’d trust a Black & Decker branded book to be all that good at any topic. While I feel my initial skepticism stands regarding the book’s production values, I was pleasantly surprised by the book’s technical information, especially its section on attaching to the trees.
I knew that when attaching to the trees it would be important to properly support the tree house, not kill the tree and allow tree house and tree to move independent of each other. The Platform Ancoring Techniques section was fantastic. It reviewed the entire anchoring process. After reviewing the section multiple times, I thought the solution would be the commercially available Garnier Limb anchors they mention. Unfortunately, when the anchor and associated bracket are priced out, it comes to $125.00 per attachment point (plus the special drill bit you need to rent or buy). This was more than we were willing to spend, so I set about building my own.
Since I couldn’t source such big bolts at the local hardware store, I began by ordering some ¾” x 10” galvanized lag bolts from McMaster-Carr. In order to transform these into homemade Garnier Limbs, I added two (2) galvanized washers and a length of ¾” galvanized pipe between them. After they were assembled, I think the homemade bolts came out pretty well.
Before installing the bolts, I glues together double 2x8 joists to form the perimeter of the platform. One laminated joist each at 10’, 12’ and 16’ long.
In order to install them, I first picked and marked a height on the first tree (I was not particular about the exact height, as long as I could walk under the tree house). Using my right angle drill and a 9/16” auger bit, the 6” deep hole was easy.
Then I set up my laser level and transferred the height to the remaining two (2) trees. Since it was getting late I decided to drill the second hole in the first tree and see if I could get the anchors installed. After drilling the second hole just like the first, I started ratcheting in the bolt.
It was about 2” in to ratcheting in that first bold that I realized a 9/16” clearance hole was too damn small for a ¾” bolt. I drilled out both holes to ⅝” and both bolts when in like champs.
With the joists glued up, the first two (2) bolts in and the other trees marked I called it a night. More tree house building to come. In the mean time, heres a quick video showing the bi-directional movement of the mounting bracket system Im using.
Read More..
When she thought it was time to start building, my wife brought the Black & Decker The Complete Guide: Build Your Kids a Treehouse home from the library. I went through it with a slight skepticism. I can’t say I’d trust a Black & Decker branded book to be all that good at any topic. While I feel my initial skepticism stands regarding the book’s production values, I was pleasantly surprised by the book’s technical information, especially its section on attaching to the trees.
I knew that when attaching to the trees it would be important to properly support the tree house, not kill the tree and allow tree house and tree to move independent of each other. The Platform Ancoring Techniques section was fantastic. It reviewed the entire anchoring process. After reviewing the section multiple times, I thought the solution would be the commercially available Garnier Limb anchors they mention. Unfortunately, when the anchor and associated bracket are priced out, it comes to $125.00 per attachment point (plus the special drill bit you need to rent or buy). This was more than we were willing to spend, so I set about building my own.
 |
| The Garnier Limb from treehouses.com |
 |
| The 3/4" x 10" galvanized bolt. |
 |
| The washers and 3/4" galvanized pipe ferrule installed to form my homemade mounting bolt. |
 |
| Im using commercially available post straps from Home Depot as the bracket that will attach the joist to the mounting bolt while allowing bi-directional movement. |
 |
| Gluing the joists. |
 |
| This drill is one of my absolute favorite tools. |
 |
| Thats as far in as I could get, using a 9/16" pilot hole. |
 |
| Finally, a rock solid anchor bolt. |
Tuesday, January 28, 2014
I found a new woodworker on YouTube
This guy is my new woodworking hero! I cant wait until I have some free time to just sit there and watch all of his videos. http://www.youtube.com/user/lgosseuxdbois
Read More..
Monday, January 27, 2014
Turning a closet into a workspace Part I
In this new project, I will be renovating a standard 2 x 4 closet into a workspace. The space will have a laminated countertop, which will accommodate the computer and monitor, and shelving above for storage. I will also be adding new bifold doors so that the area can be closed off.
The first step is to make the laminated top. Ive already made up my substrate, which is two pieces of 3/4" particle board glued together, and all surfaces sanded. This top will have a finished front edge, which is what I apply first. I cut the edge strip oversized, apply adhesive to both the strip and the substrate, let dry, and apply. The excess is trimmed off with a router. Here is a picture of the front edge just after trimming...

Next, Im ready to apply the top laminate. Again, Ive coated both surfaces with adhesive and will let them dry completely before putting them together. Once the adhesive is dry and they are put together, it will be nearly impossible to separate them. The adhesive is milky when you first put it on, and will dry to a semi-clear color. Here is a picture with wet adhesive...

A picture of the two pieces joined and trimmed...

For all countertop edges, I use the power sander with 220 grit paper to smooth. This way there will be no sharp edges. Heres a close up of the front edge...

And the overall top...

The doors and ledger strips are being painted, and the shelving is 3/4" white melamine. Install day is coming, and so will more pictures!
Read More..
The first step is to make the laminated top. Ive already made up my substrate, which is two pieces of 3/4" particle board glued together, and all surfaces sanded. This top will have a finished front edge, which is what I apply first. I cut the edge strip oversized, apply adhesive to both the strip and the substrate, let dry, and apply. The excess is trimmed off with a router. Here is a picture of the front edge just after trimming...
Next, Im ready to apply the top laminate. Again, Ive coated both surfaces with adhesive and will let them dry completely before putting them together. Once the adhesive is dry and they are put together, it will be nearly impossible to separate them. The adhesive is milky when you first put it on, and will dry to a semi-clear color. Here is a picture with wet adhesive...
A picture of the two pieces joined and trimmed...
For all countertop edges, I use the power sander with 220 grit paper to smooth. This way there will be no sharp edges. Heres a close up of the front edge...
And the overall top...
The doors and ledger strips are being painted, and the shelving is 3/4" white melamine. Install day is coming, and so will more pictures!
Sunday, January 26, 2014
I am so excited! Somebody made a cooler box from my free plans!
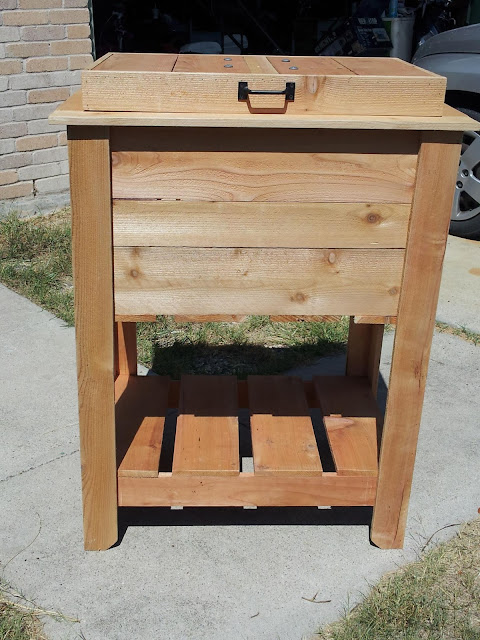
The other day I got a message from Chris Dunn on Facebook. He sent in a picture of a small foam cooler box that he made from my plans! He is officially the first person to build one of my projects and share the picture with me! Good job Chris!


Read More..
James Smith made this larger one based off the plans from the prototype!
Subscribe to:
Posts (Atom)
